Showing posts with label flowers. Show all posts

Tuesday, 11 October 2011

Victorian Whistle Cup

This delightful little cup is about 120 years old and I discovered it at a flea market last month. It was made c1880 - 1890 and when I saw it, it made my heart smile.

The best bit is that it was 200 pennies :)  Yes...  just £2.

Lella Loves... Flea Markets

The decoration is all hand-painted and I love the naive flowers and the suggestions of leaves. So simple yet too pretty for words.

Lella Loves... Flea Markets

The whistle is actually the bird and it is cleverly formed formed within the shape of the handle. It was meant to keep the attention of a toddler at meal times.

So sweet... Love it!

Lella Loves... Flea Markets

The Think of Me is a lovely sentiment and is painted in gold.

Lella Loves... Flea Markets


I call this a late Victorian child's milk cup, made by an English potter. I have seen a similar one on eBay and the seller says his was made in Germany but it was the same date.

As an English blogger, and collector of delicious tat, I have some knowledge. The years between 1837 to 1901 were the reign of Queen Victoria. Ergo, items made in that period are called Victorian.

However, I don't know everything so any information would be appreciated.

I love the little darling and it's not going anywhere!

I know I bang on about table-top sales and collectable fairs but if there is one thing you would enjoy, that is to go to a flea market on a Sunday and browse the stalls with an open mind.

Have a lovely day folks.

Lella  xx

http://lellalovescreativity.blogspot.com

I want to thank Rose Petals from Heaven for this lovely blog candy and its pretty blue birds.


Here is her blog button :)


Friday, 7 October 2011

Wreath (Oak Leaves)

Hello there and leafy greetings to another floral Friday.

I have been looking forward to this blog-make for ages. October is my favourite month as I love pumpkins, the colour orange, pot pourri and candles. And crows! And acorns!

Lella Loves... Wreaths

This is my door wreath for October and I made it using silk leaf garlands and prim decorations which I bought online.

Lella Loves... Wreaths

If you would like to create something similar for your home, you will need:

Large twiggy wreath
3 leaf garlands or 12 similar stems of your choice
Snips or scissors
Prim decorations such as crows, hearts, stars or pumpkins
Cable ties
Wreath hanger

*Tip: Prim is a term for primitive, handmade decorations but they can be found in either resin or wood. You should use anything you like to decorate your wreath such as rusty bells, acorns or berries. Let your creativity flow!

Lella Loves... Wreaths

Firstly, take your wreath and decide which side you are using. Look at it from all angles and make sure it is neither top-heavy or too skinny on one side.

Lella Loves... Silk Flowers

Take your leaf garland and, using tiny cable ties, attach one end to a very wide twig on the back of the wreath.

Lella Loves... Craft Tools

Snip off the excess tie with snips.

Lella Loves... Wreaths

Wind the leaf garland in and out of the twiggy wreath, making sure your spaces are even and the leaves are not bunching.

Lella Loves... Wreaths

Once you have finished your first garland, step back and see how your wreath is looking. If you are happy with it, take several cable ties and fix the garland to the wreath on the back side.

Leave the cable ties uncut as their tails will help you to remember which is the back of the display.

Lella Loves... Wreaths

Take your second garland and continue wrapping the leaves over the wreath.

Lella Loves... Wreaths

During the process, check the side where the cable ties are to help you remember which side is the front.

Lella Loves... Wreaths

You are nearly finished when you have covered the wreath entirely. Nearly finished but not quite.

Check over the wreath and look for leaves which have been squashed by the garland or trapped under the twigs.

Lella Loves... Wreaths

Flick them free as the more leaves, the better the overall look. When you are happy with the wreath, fix all the garlands in place with more cable ties. Snip off the tails once you have finished.

Lella Loves... Wreaths

One of the prettiest things you can do is to add decorations to your wreath. Look for wooden hearts and stars in Hobby Craft or try a cake supply store for small gingerbread cutters.

If you like my particular look, search eBay.com for little crows and stars to add extra texture to your wreath.
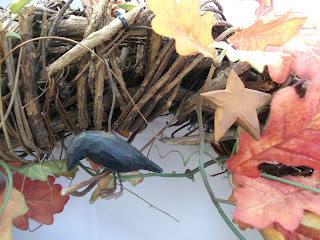
Lella Loves... Wreaths

I bought the crow and stars decorations online but if you are handy with modelling clay, you could have a go at making your own using Fimo. 

Simply buy the Fimo ready-dyed and sculpt your preferred shapes. Add a wire loop and bake in the oven.

Lella Loves... Pumpkins

I also bought a few metal pumpkins but there is an unspoken rule of knowing when to stop. However, I am obsessed with pumpkins and I am sure these friendly fellows will find a spot somewhere in Lella Towers.

Lella Loves... Wreaths

And here is my finished wreath. I love it :) I really do.

This is most definitely one of my favourites and would really encourage you to have a go and make your own. The sense of satisfaction is amazing and it will give you that creative outlet you might be looking for.

I want to show that wreaths are not just for Christmas nor should they be considered funeral sentiments.

Wreaths are circles: they represent the circle of life. We speak of family and friends in terms of circles. Our most trusted friends are part of our inner circle. Wedding bands represent the promises and the circle of trust within a marriage.

Enjoy wreaths for their beauty and have fun making your own.

Please feel free to leave me a message as I enjoy reading your comments.

Best wishes and have a lovely day.

Lella Loves... Crows

Caww Caww...

Lella xx

http://lellalovescreativity.blogspot.com

Saturday, 1 October 2011

Vases (Test Tube)

Yesterday I wrote a piece on displaying silk flowers and there were lots of them in that lovely garden pot.

However, if you prefer real flowers, today's post is an idea to show you how you can buy a single stem and enjoy it without the need for huge water-filled vases or tubs.

Lella Loves... Vases

I paid 20p for this test tube at a car boot sale and I knew that it would make a handy vase.

Lella Loves... Vases

All you will need to follow this blog-make is a test tube, copper wire and some snips.

Lella Loves... Vases

Simply cut a piece of copper twice the length of the test tube and fold in half.

Lella Loves... Vases

Wrap the copper around the top of the tube and then twist until both wires are together.

Lella Loves... Vases

Now make a hook and fold the wire back around the top of the test tube.

Lella Loves... Vases

All you need to complete your look is a window sucker and a flower head of your choice.

So simple and yet so easy to make. I really enjoyed making it so please feel free to leave a comment if you make you own.

Pop back soon,

Lella xx

http://lellalovescreativity.blogspot.com

Friday, 30 September 2011

Silk Flowers (Cream Anemones)

Hello there and welcome to another floral Friday. Silk flowers are a passion and every Friday I love to share one of my arrangements with you.

If you like anemones, you should like today's display.

Lella Loves... Silk Flowers

Here is an old garden tub which has anemones, hypericum and ivy in the display. I assure you, everything you see is an everlasting floral.

If you wanted to create this in your home, you will need:

40 Anemones
6 Ivy
3 Hypericum berries
Terracotta pot
Piece of tissue

Lella Loves... Old Pots

This pot was in my garden and I love the algae so I only cleaned the inside of the pot. You should use any tub or vase which suits your home.

*Tip: To achieve this look in a few months, not years, simply purchase a new terracotta pot, slather it with natural yoghurt and then place it under a large tree or behind a bush in your garden.

The covered pot needs to sit for 3 or 4 months in a damp corner but not where the yoghurt might get washed off in a downpour.

Lella Loves... Silk Flowers

You will need at least 40 anemones. They are very reasonably priced. These were purchased in The Range and were no more than 75p each. Dunelm has similar flowers in white and pink.

Lella Loves... Silk Flowers

Choose some everlasting berries for your arrangement as they give extra texture to the display. Really good examples, such as these hypericum heads, will cost about £4 a stem but they can be used for years so buy the best you can find.

Lella Loves... Silk Flowers

Floral supplies such as this ivy are a must as they give your arrangement much needed greenery. No matter which flowers you choose, there should be a happy balance of both petal and leaf. All flowers are beautiful so enjoy arranging them.

Similar ivy stems can be bought in Dunelm for 59p. A real bargain in my opinion!

Lella Loves... Silk Flowers

Cover the hole with a folded piece of tissue.

Lella Loves... Silk Flowers

To get started, lay the first ring of stems around the edge of your pot.

Lella Loves... Silk Flowers

Build up the anemones until you have a full tub.

Lella Loves... Silk Flowers

Once the anemones are in place, add your ivy. Try to place the taller stems more toward the centre and pop the shorter stems around the rim.

Lella Loves... Silk Flowers

When you are happy with your ivy placement, add the berries. Hypericum heads give good value for money as they are quite large and offer a lot of colour for the cost.

Your display should look something like this. I think it is lovely, and this very arrangement sits in my kitchen.

I hope you enjoyed today's post and feel free to leave a comment.

If you wanted to commission an arrangement, please contact me. Wealthy patrons are happily catered for.

Cheerio and have a great day.

Lella  xx

http://lellalovescreativity.blogspot.com

Friday, 23 September 2011

Silk Flowers (Cherry Blossom)

Hello there, and welcome to another floral Friday. Today I am going to show you how to create a very large display of cherry blossom. Each branch is 3ft in height and I have combined it with various greenery including willow. The whole display is finished off with a fairy ring of grasses.

Lella Loves... Silk Flowers

If you wanted to recreate this display, you will need:

Terracotta Long Tom pot
Bag of gravel
Newspaper
11 branches of cherry blossom
11 branches of pussy willow
11 branches of winter stems
22 stems of grass

Lella Loves... Silk Flowers

These cherry blossom stems were bought from Dunelm. Most Dunelm stores stock them in the red option, white and baby pink.

If you fancied orange, blue or purple blossom, try Wilkinsons as they have a wide range of floral supplies in all the jewel tones.

Lella Loves... Silk Flowers

I bought these twiggy winter stems from Hobby Craft but it was a few years back. If you have a neighbour with real fruit trees, ask them if you could have a few stems next time they prune their trees.

Lella Loves... Silk Flowers

Pussy willow stems can be found in various garden centres such as Notcutts or Wyvale.

Lella Loves... Silk Flowers

The grasses are a super bargain: they are 59p a stem from Dunelm. There are several colour variations so choose the greenery which will enhance your blossom choice.

Lella Loves... Silk Flowers

To start, block the flower pot's hole with several sheets of newspaper and half-fill with shingle.

Place all the cherry blossom stems in the centre, and let them face in all directions. Every stem has a natural lean: don't try to fight it. You then arrange the willow and the winter twigs in a ring around the top of the Long Tom - the base of the cherry blossom. The stems of the greenery will support the much taller stems of the blossom.

Finally, infill with all your lovely grass.

Lella Loves... Silk Flowers

Have fun arranging this in your home. If you choose a different coloured blossom, do let me know as I love to hear how you make the blog-makes your own.

Three cheers for silk flowers...  Hip. Hip.. Hooray...!

Lella  xx

http://lellalovescreativity.blogspot.com

Tuesday, 20 September 2011

Hats (Wide Brim Floppy Diva)

Today's post is to show you how easy it is to take your favourite hat and give it a different look for the upcoming season. 

If you like this wide brim style, treat yourself to a floppy diva hat. My flower pin look works just as well on a cloche or a fedora. You won't have to spend more than a few pounds on the flower pins.

Lella Loves... Hats

I bought this lovely pure wool hat and even though I love the beaded bow applique, I had three black flowers just waiting to be used.

If you wanted to adorn your own winter hat, you will need:

Fabulous wide brimmed floppy hat in a muted, winter colour
3 fabric flower brooches

Lella Loves... Hats

Summertime is not the only time to wear flowers.

Lella Loves... Flower Brooches

To start, take your hat and brooches and make sure you are sitting in good, bright daylight.

Lella Loves... Hats

Open up the pins.

Lella Loves... Hats

Attach your first pin across the bottom.

*Tip: The trick to pinning your flowers is to set the pins in a triangle. After you have fixed all the flowers in place, fluff out the petals.

Lella Loves... Hats

The three brooches should now blend and look like one big frothy black peony.

Lella Loves... Hats

If you had always wondered why people buy black flower brooches or where do they pin them, I hope this little project will encourage you to buy three black lace flowers next time you see them.

It proves you can be super-chic even in cold weather!

Have fun :)

Lella  xx

http://lellalovescreativity.blogspot.com

Lella Loves... Books

All books are free postage and are shipped from Amazon UK.

Click on any book to see price and availability.

Usually delivered within 48 hours.

More books to browse