Showing posts with label ribbon. Show all posts

Thursday, 22 September 2011

Handbag Charm Pins (Green)

Hello there and today's post is another example of how to make a charm pin for your handbag.

If you love green and honey-coloured gem beads, this is the project for you.

Lella Loves... Handbag Charm Pins

My finished handbag charm which took no more than 1 hour to make.

Lella Loves... Handbag Charm Pins

I found this necklace in my local Cancer Research store and paid £2.50 for it yet its original price label showed that someone had paid £24.99 in a large high street department store. 

Charity shop bargains never cease to amaze me.

If you wanted to make your own handbag charm pin, all you need is a large kilt pin, a lovely beaded necklace which has metal fastenings and pliers. You can add ribbons or lace if you like the look.

Simply follow this project and let your creative side flow.

Lella Loves... Handbag Charm Pins

To get started, I took my round-nose pliers and began to dismantle the necklace.

Lella Loves... Handbag Charm Pins

Leaving three or four links, I twisted at the points where the beads linked and they simply open out.

Lella Loves... Handbag Charm Pins

Having selected my chosen beads from the original necklace, I threaded them on to my kilt pin.

Lella Loves... Handbag Charm Pins

I continued to thread the beads and I adjusted the links as I felt is necessary.

Lella Loves... Handbag Charm Pins

Ribbon is something I like to use to add an extra texture to the overall look.

Lella Loves... Handbag Charm Pins

Using a basic up-and-over loop, I tied three little ribbons and pulled tightly. The ribbon tails were trimmed at an angle to complete the look.

Lella Loves... Handbag Charm Pins

After I added my ribbon, I slipped on a few more beads to pad out the charm as I do like more than less :)

All I have to do now is find a bag to put it on and I will take a photo of it for this blog.

If you wanted to see the previous post on charm pins, simply click here:


Many thanks for reading,

Lella xx

Monday, 29 August 2011

Scrapstores and Recycling Arts Projects

Hello there and with the start of a new week, I want to tell you about a fabulous resource that is most probably within 10 or 12 miles of your house and you didn't even know it:  Scrapstores.

Yes, scrapstores are the future! They are recycling warehouses, often funded by your local council and they sometimes go under the name of a Recycling Arts Project/Club.

I have included photographs to show you some of the items I have discovered and brought home on my trips to my local arts project. They are an example of what can be found. All of this fabric came from my local scrapstore - for free!

Lella Loves... Scrap Fabric

I promise you that if you went to a scrapstore, you would be amazed at the range of products available to you for free (once you become a member, of course.)

Lella Loves... Buttons

How it works:

Business offer their local scrapstore non-toxic, clean waste and, as such, the scrapstore's 'stock' varies from week to week. The scrapstore staff/volunteers collect the useful 'scrap' from local companies and make it available to their members - for free! All you pay is a joining fee and you are then able to take whatever you need for craft projects, school plays, after-school art activities and so on.

The other good news, on becoming a member, is that you are doing something positive for the environment.  Reusing and upcycling clean, commercial waste is another way to bring different items into your craft room.

To give you an example of the items you might find, my local scrapstore collects cardboard tubes from a printing press, fabric sample books from high street stores and designer manufactures, greeting cards and over-runs from a local printer as well as foam, kapok, and wadding from an upholstery firm.

Last time I visited they had bolts of fabric, loads of zippers, promotional pin badges, old posters, ceramic tiles, bubble wrap, rub-off foils, plastic containers, tins, bottles, picture frames, ring binders and so on... 

Lella Loves... Picture Frames

A is for Aladdin's Cave:

Scrapstores are the Aladdin's Cave of creative crafting and 'Lella loves' creativity! :) 

You are only limited by your imagination. These hidden gems offer individuals as well as schools, clubs and play groups, a wide array of clean, reusable waste, and it is waste that you and I would otherwise never get the opportunity to salvage.

Lella Loves... Old Signage

I say to you today: look up your local scrapstore and pay them a visit. If it is not for you, no harm done!

However, if you are like me and you love fabric, buttons, old frames, paper, trimmings and so on, then do please join the hundreds of other members and benefit from being a member of a scrapstore and for a (usually) very low annual membership fee.


Here is the link to the list of scrapstores in the the UK.


Visit a scrapstore this week and remember, half the fun is that you never know what you might find there.


Please let me know if you went and joined and feel free to post a comment. 


Lella  xx

Saturday, 13 August 2011

Hand-tied Ribbons and Bows

Hello there and welcome to my 'How to make a beautiful bow' tutorial.

If you love ribbons and you have always wanted to be able to give beautifully wrapped gift boxes or give a bear a bow, today's creative challenge is just for you.

Tying the perfect bow is a bit like juggling: once you 'get it', you will never forget how to do it.

Here are two examples: a gift box (single ribbon) and a teddy (three layers of satin and silk sheers), both showing bows hand-tied by me.

Lella Loves... Ribbons and Bows

Lella Loves... Hand-tied Gift Bows

To create a single bow, you will need:

A piece of ribbon about 1inch wide and approx 2 - 3 metres in length.
Gift box
Nimble fingers
Patience!

The tails need to lay left over right. This is the collar and their placement is crucial.

Lella Loves... Bows (1)

Start by wrapping the ribbon around the box so it ends. See photo 1.

Lella Loves... Bows (2)

Take the tail which is on the right hand side and fold it up and under the collar on the right hand side. See photo 2.

Lella Loves... Bows (3)

Bring the two tails down and, using both hands, make a loop in each of the tails. See photo 3.

Lella Loves... Bows (4)


Now fold the loops back on themselves. Fold them right over left. See photo 4.


The next move sounds complicated but what you are doing is the reverse of the original granny knot in the collar.

Lella Loves... Bows (5)

Look at the photo to see, at this stage you should have a loop peeking out the top on the left hand side.

Now take the tail which is sitting on the right hand side and pull it down, over the right hand loop. To be clear, this is the tail which has the pink underside showing - it is this tail which needs to come down to face up on the right bottom. See Photo 5.

Lella Loves... Bows (6)

This is how your bow should be shaping up. The bow will be coming to life at this stage. (Exciting, isn't it!)

However, keep calm and gently tighten the bow whilst retaining the shape. The temptation to tug and pull too tightly must be restrained. After all, this is a Lella Bow  (^_^)

Lella Loves... Bows (7)


Remember, you are not tying shoelaces! 
Make it the best it can be. Check your progress using photo 7.


*Tip: When tightening the bow, slip your first two fingers from your left hand inside the loops and pull gently on the tails with your right hand. The loops will keep their shape if you master this thumb-holding  technique. 

Lella Loves... Bows (8)


The aim is to manipulate the ribbon into a beautiful bow. Simply adjust and tighten according to the ribbon you have used and the size of the loops you want.

Ta...dah!  Your bow should now look like this. See photo 8 below.

Do note that the centre ribbon should sit perfectly and facing downwards as a strip.


Lella Loves... Bows (9)

Your first few attempts might well result in a bowtastic mess but don't worry; follow the instructions at the pace Mr Snail would!

Don't be afraid to undo and start again if it looks shoddy. Be patient with it to achieve the best results especially if you are using a ribbon with a definite face side such as velvet or a printed sheer. It might only be ribbon but it can look super when tied correctly.


Lella Loves... Bows (10)


This is a common error - the ribbon gets twisted at the 'up and under' fold. The loops have twisted as you have fed through at the second grannie knot stage. See photo 10 or start again and refer back to photo 1.

If you would like to buy some ribbon, please use the Buy Now button and do fill in the text box to let me know which colour(s) you would like.


Ribbon Types
State your colour choice(s):


Here is another example of a bow made using two pieces of silk organza ribbon.

Lella Loves... Ribbon and Bows

Remember, if you are not happy with how your finished bow looks, pull on the tails to take you right back to the first granny knot on the collar.

Be patient and start again by forming the two loops on each side. Practice over and over because once you learn this skill, it will be with you for always.

You are welcome to leave me a comment and if you enjoyed this.

Many thanks.

Lella  xx

http://lellalovescreativity.blogspot.com

Thursday, 4 August 2011

Ribbon Bangles

It was lovely to receive messages yesterday and, due to those requests, today's craft tutorial is how to make a ribbon bangle.

Lella Loves... Ribbon Bangles

In less than an hour, you too can make yourself a similar accessory which your friends will say,

"Where did you buy that? I want one - It's darling!"

I have been making these for several years and I always receive compliments when I wear them.

Lella Loves... Ribbon Bangles

You will need a plain, reasonably flat bangle. 

Take 3 metres of your favourite ribbon - either sheer or satin - or pre-cut several 1cm wide strips of a pretty, ditsy, daisy print cotton fabric before you start. 

12-20 inches long is a workable length and don't worry about a little fraying as it adds to the handmade/homemade charm.

Lella Loves... Ribbon Bangles

*Tip: A dab of glue on the inside of your bangle - at the start and every inch or so - will hold the ribbon in place whilst you wrap.

Leave a 10 inch 'tail' and then begin wrapping the ribbon, or fabric, over and over and work with an overlap of half your ribbon/fabric width. 

You will need the front tail to create a lovely bow when you tie it to the end tail as the final flourish to your bangle.

When you arrive back at your start point, tie a bow with both ends, trim your ribbon tails and pop it on your arm! You now have a ribbon bangle to wear with pride. After all, you made it!

Lella Loves... Ribbon Bangles

If you wish to purchase one of my ribbon bangle kits, they are £4.75 each including postage to any UK address. Please choose your ribbon from the selection on the drop-down menus when you order. 

NB: There is a Buy Now for organza and a separate checkout for satin.

Ribbon Bangle


Ribbon Bangle


Do let me know what you think of the projects by leaving a comment. 

Many thanks for reading.

Lella xx

Tuesday, 2 August 2011

Teddy Bear Necklaces

Do you have an old teddy?  Are you a fan of Charlie Bears?  

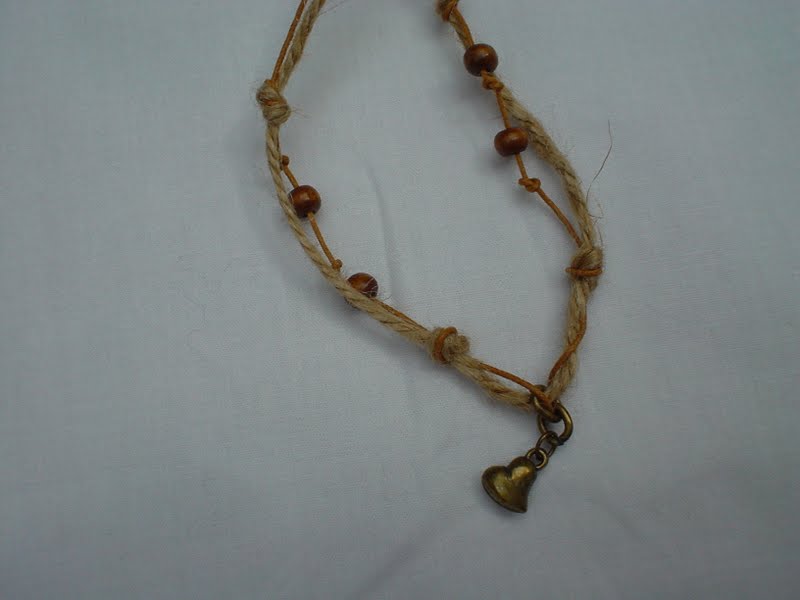
Today's project is to make your favourite bear a necklace using wooden beads, buttons, a brass bell or an old key. You could try using charms off a broken necklace or any mis-matched buttons you have in the sewing box. 


Keep any pieces of lovely ribbon and you could make something like this for your bear.

Lella Loves... Teddy Necklaces

This bear (see below) I bought at an afternoon car boot and he was stuffed in a box with toy cars, doll's clothes and a wooden boat.

Lella Loves... Being Creative
I made his necklace from a piece of waxed cord and a handful of old buttons. 

Here is another necklace (see below) which I made from wooden beads, cord and jute. The little heart pendant came off a broken charm necklace.


Lella Loves... Being Creative

Lella Loves... Teddy Necklaces


Once you have your beads and buttons ready, all you need is something to thread them with. Many craft shops sell waxed cord - £15 a reel - or leather thonging for £60 a reel. 

*Tip: I used garden twine, a brass bell and wooden beads in this project as I wanted that prim, rustic look.

If you wanted to make a necklace, I am happy to provide you with all the items you require. 


The kits can be ordered in any colour you want.  

Choose from the drop-down menu to make sure you receive a kit with colours you love. 


Colour Options


Here are some examples of how to thread. Be creative, ladies and let me know what you think of the projects by leaving a comment.
Many thanks for reading.
Lella  xx


Lella Loves... Being Creative


Lella Loves... Being Creative


Lella Loves... Being Creative


Lella Loves... Being Creative


Lella Loves... Being Creative

http://lellalovescreativity.blogspot.com

Monday, 1 August 2011

Fabric Hearts

I love fabrics and one of my favourite hobbies is fabric crafts. Cushions, bunting or fabulous patchwork is what I love to do on a rainy day. Off-cuts, old shirts and tatty curtains are a good source of bulk fabric for craft projects.

Do you enjoy creating something using material from a previously well-loved shirt or your granny's dress? If so, this little project is perfect for you.

Here is a basic padded heart which you could make in an hour.

Lella Loves... Fabric Hearts

To make one of these lovely little hearts, you will need:

Cotton fabric
Scissors
Stuffing
Sewing machine and a needle/thread for hand-stitching
Ribbon
Button

Take an A4 piece of your favourite fabric and make a template - a heart shape on a piece of cardboard will do. Draw two hearts and cut out.

*Tip:  Use pinking shears to avoid fraying.

Sew the fabric hearts face-to-face and leave an inch gap at the bottom section of the straight edge.
Turn inside out and fill your heart with stuffing, dried lavender or cotton wadding.

When you are happy with the padded heart, hand-stitch the stuffing hole closed as neatly as possible.
Take a piece of toning ribbon and a pretty button and sew to make the hanging loop.

Perfect for hanging on a wardrobe door.

Lella Loves... Fabric Hearts

To see lots more of my padded hearts, pop over to view my Flickr photostream:


If you wish to purchase one of my hearts, they are £4 each including postage to any UK address.

You are welcome to leave a comment under any of my postings.

Many thanks for reading.  See you soon :)

Lella x

Lella Loves... Books

All books are free postage and are shipped from Amazon UK.

Click on any book to see price and availability.

Usually delivered within 48 hours.

More books to browse