Showing posts with label embellishment. Show all posts

Monday, 26 September 2011

Bunting (Calico)

Hello there and Happy Monday! Today's post shows you how to jazz up some single-sided, plain cotton bunting.

I usually make mine and my flags are double-sided so I know the effort required. After seeing this beaded calico bunting, there was now way I could leave it in the shop: all of it was coming home with me.

Lella Loves... Bunting

I found this in Oxfam. Not donated goods; it was in their Fair Trade - New Goods section - and it was only £4.99.

The beautiful beads were already sewn on: that alone saved me an hour.

Lella Loves... Bunting

These are hand-painted gift tags and they are wooden so they make great embellishments.

Snip off the loops and save the twine for decorating your seasonal wreath or maybe you are following yesterday's blog-make. If you wanted to make your own twiggy wreath, here is the link:

http://lellalovescreativity.blogspot.com/2011/09/wreath-hand-made.html

Lella Loves... Bunting

The weight of the wooden tags helps the bunting to swing nicely. By adding alternate shapes, you can create very simple but joyful decorations for an older child's room.

I love this look and it took no time at all to create.

Keep your eyes open for unusual decorations in the run up to the festive season and think of ways to enjoy them all year round.

Lella  xx

http://lellalovescreativity.blogspot.com

Monday, 12 September 2011

Button Magnets

Hello there and Happy Monday :)

Today's project is another fun and easy blog-make. It was one of the highest rated 'Would like to see' ideas on my crafting poll in the first week of August.

I am talking about Button Magnets.

Lella Loves... Button Magnets

My heart races when I see an old box of buttons and there is something so charming about them. It might be the crafting potential or the fact that a tub of buttons takes time and dedication to gather.

Lella Loves... Button Magnets

When people have seen my button magnets, they love them. If you like the sound of magnets which are 'as cute as a...', you will most probably want to make your own.

If so, here is a list of items you will need:

A good selection of mixed buttons
Magnets in various sizes
Hot glue gun and glue sticks
Or, Epoxy glue duo, bottle caps and toothpicks

Lella Loves... Button Magnets

When buying your magnets, try to purchases various sizes as you will most probably have buttons in various sizes.

To get started, plug in your glue gun and let it heat up.

Lella Loves... Button Magnets

Open all your magnets and separate them on to a plain white sheet. Spend some quality time choosing your buttons as once they are glued, they are permanent.

Match up the buttons with the magnet, making sure that the button is slightly larger than the magnet.

Lella Loves... Button Magnets

The best glue to use are non-toxic glue sticks which are available in all good crafting stores. They require a 'glue gun' as the glue stick is inserted and the glue melts on a metal plate. It is easy to use but do take care as melted glue gets as hot as candle wax!

If you are familiar with much stronger adhesives, you will be used to using an epoxy mix such as Araldite. This glue will come in a pack with two tubes and you simply mix the amount you require. Please read the instructions as it is stronger than super glue!

*Tip: When mixing an epoxy glue for small craft projects, save your bottle caps as they make tiny mixing pots and can be disposed of when you have finished. 

For detailed application, I suggest you mix and apply with a toothpick.

Lella Loves... Button Magnets

When using a glue gun, apply a blob of hot glue to the magnet first and, working quickly, take your  button, gently 'squidge' the button on to the hot glue and let the glue ooze up through the button holes.

Lella Loves... Button Magnets

It is very satisfying to see your button magnets on your fridge and using them is fun, knowing you made them.

Try this and do let me know how you get on.

Many thanks

Lella xx

Wednesday, 7 September 2011

Cupcake Tea Towel

Hello there and today's project requires a sewing machine for ease and speed. Here is a cupcake which I made from old clothes. I assure you that applique and patchwork is great fun and very addictive.  

This cupcake is easy to design and sew. Simply draw your own templates, cut and sew the cupcake and applique it to a tea towel.

Lella Loves... Applique

I recycled a stunning red floral dress - it was never going to fit me - I only bought it for the fabric! The pink material was a beautiful sequinned cotton tunic which saved me time hand-sewing all the silver twinkles.

If you wanted to give your tea towel a yummy cupcake, you will need:

Plain fabric for the cake case
Floral fabric for the cake top
Backing fabric
Scissors
Card and pencil
Sewing machine
Tea towel
Button

To start, take your chosen fabrics and iron them.

Lella Loves... Applique

Take two pieces of card and draw a cupcake base, making sure that you leave an extra inch when you cut out your template. Free-hand draw the cupcake top and draw as your heart desires. I drew a large over-baked cake with three swags but yours could be just one swag or five.

Lella Loves... Applique

Lay your templates on your chosen fabrics, pin them and cut out. 

Lella Loves... Applique

I used a sewing machine to stitch mine to a piece of backing fabric. This gives the cupcake stability and enables you to outline the cupcake with a contrasting thread.

Lella Loves... Applique

I chose a pink tea towel but yours should be the colour to match your own fabrics.

Lella Loves... Applique

Have a play with different buttons if you fancied adding a 'cherry' to your cupcake.

Lella Loves... Applique

I hope you try this little project as it is rather satisfying to pick up a tea towel that you made look so fabulous. Start to gather cotton off-cuts and if you don't like cupcakes why not draw a teapot or a chicken. Create something you will enjoy using.

Have a lovely day 

Lella  xx

Tuesday, 30 August 2011

Embellishments (Cushions)

Today's project is an easy one.

All you need is a nice cushion which you want to make into a fabulous cushion.

Before you ask, I did not make these lovely cushion. (I wish!!  ;) They are from Laura Ashley and were £30 each. However, what I have done is to simply jazz them up. They are very pretty to begin with but I added buttons, beads and crocheted flowers.

Lella Loves... Embellishments

No cushion with cupcakes could escape my bead and buttons treatment!

Lella Loves... Embellishments

This is the cushion as purchased but I wanted to add a little touch of 3D to the appliqued cakes.

Lella Loves... Embellishments

This crocheted flower came off some knitted slippers from last Christmas.

Lella Loves... Embellishments

Sparkly little flower buttons such as these were 12p each and the teeny-tiny green flower is a bead.

Lella Loves... Embellishments

Crocheted flowers, satin roses and little buttons were salvaged from slippers and worn out clothing. I have been saving old buttons and trimmings for years.

Lella Loves... Buttons

Vintage buttons are a pleasing item to collect. I buy them whenever I see them as they are usually really cheap. I found these at a large second-hand goods market.

If you like the idea of this, start collecting flower-shaped buttons, crocheted flowers and satin buds. The best way is to stop at a haberdashery shop or pop into a market once in a while and allow yourself to spend £1. Yes, just £1 and you could buy a cute selection of little flower buttons or satin roses.

Have a lovely day and treat your cushions to an up-do.

Lella  xx


Tuesday, 2 August 2011

Teddy Bear Necklaces

Do you have an old teddy?  Are you a fan of Charlie Bears?  

Today's project is to make your favourite bear a necklace using wooden beads, buttons, a brass bell or an old key. You could try using charms off a broken necklace or any mis-matched buttons you have in the sewing box. 


Keep any pieces of lovely ribbon and you could make something like this for your bear.

Lella Loves... Teddy Necklaces

This bear (see below) I bought at an afternoon car boot and he was stuffed in a box with toy cars, doll's clothes and a wooden boat.

Lella Loves... Being Creative
I made his necklace from a piece of waxed cord and a handful of old buttons. 

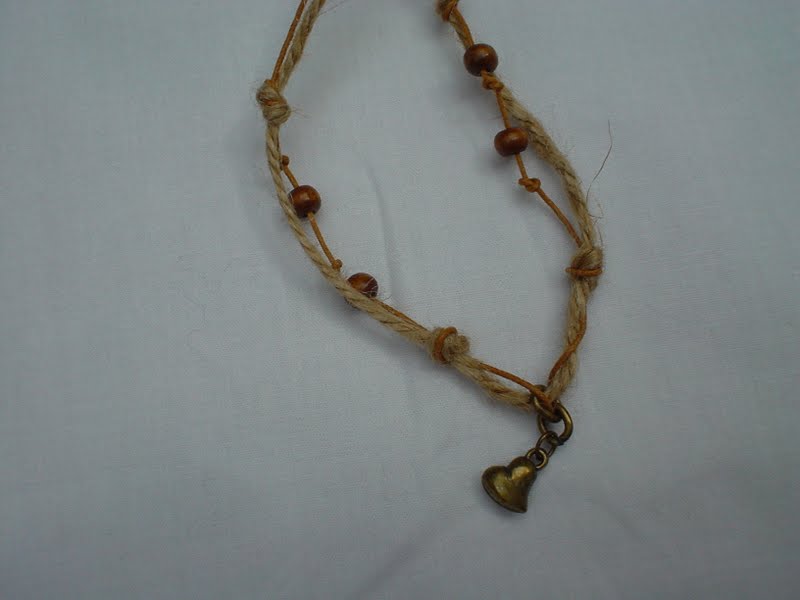
Here is another necklace (see below) which I made from wooden beads, cord and jute. The little heart pendant came off a broken charm necklace.


Lella Loves... Being Creative

Lella Loves... Teddy Necklaces


Once you have your beads and buttons ready, all you need is something to thread them with. Many craft shops sell waxed cord - £15 a reel - or leather thonging for £60 a reel. 

*Tip: I used garden twine, a brass bell and wooden beads in this project as I wanted that prim, rustic look.

If you wanted to make a necklace, I am happy to provide you with all the items you require. 


The kits can be ordered in any colour you want.  

Choose from the drop-down menu to make sure you receive a kit with colours you love. 


Colour Options


Here are some examples of how to thread. Be creative, ladies and let me know what you think of the projects by leaving a comment.
Many thanks for reading.
Lella  xx


Lella Loves... Being Creative


Lella Loves... Being Creative


Lella Loves... Being Creative


Lella Loves... Being Creative


Lella Loves... Being Creative

http://lellalovescreativity.blogspot.com

Monday, 1 August 2011

Fabric Hearts

I love fabrics and one of my favourite hobbies is fabric crafts. Cushions, bunting or fabulous patchwork is what I love to do on a rainy day. Off-cuts, old shirts and tatty curtains are a good source of bulk fabric for craft projects.

Do you enjoy creating something using material from a previously well-loved shirt or your granny's dress? If so, this little project is perfect for you.

Here is a basic padded heart which you could make in an hour.

Lella Loves... Fabric Hearts

To make one of these lovely little hearts, you will need:

Cotton fabric
Scissors
Stuffing
Sewing machine and a needle/thread for hand-stitching
Ribbon
Button

Take an A4 piece of your favourite fabric and make a template - a heart shape on a piece of cardboard will do. Draw two hearts and cut out.

*Tip:  Use pinking shears to avoid fraying.

Sew the fabric hearts face-to-face and leave an inch gap at the bottom section of the straight edge.
Turn inside out and fill your heart with stuffing, dried lavender or cotton wadding.

When you are happy with the padded heart, hand-stitch the stuffing hole closed as neatly as possible.
Take a piece of toning ribbon and a pretty button and sew to make the hanging loop.

Perfect for hanging on a wardrobe door.

Lella Loves... Fabric Hearts

To see lots more of my padded hearts, pop over to view my Flickr photostream:


If you wish to purchase one of my hearts, they are £4 each including postage to any UK address.

You are welcome to leave a comment under any of my postings.

Many thanks for reading.  See you soon :)

Lella x

Lella Loves... Books

All books are free postage and are shipped from Amazon UK.

Click on any book to see price and availability.

Usually delivered within 48 hours.

More books to browse