Showing posts with label old bear. Show all posts

Wednesday, 21 September 2011

Vintage Footstool

This darling little footstool is older than all of us and yet I found it, albeit in a sorry state, at a flea market. It is a 19th century walnut footstool with Tunbridge Ware inlay and bun feet.

Lella Loves... Vintage Footstool

Too cute for words. Perfect for little bottoms!

Lella Loves... Vintage Footstool

I recovered the top with a piece of upholstery fabric which was no bigger than a large dinner plate.

Lella Loves... Vintage Footstool

Much of the inlay is damaged or missing and its original cover would have been a needlework top. I don't mind the damage as the stool has a thousand stories to tell. Its current state is all part of its history.

Little stools like this can be found at larger antiques fairs and collectables markets where the dealers have the space to bring small furniture.

Lella Loves... Vintage Footstool

This is the underside: completely untouched and just as lovely.

Lella Loves... Vintage Footstool

I removed the seat pad by unscrewing the hand-made fixing.

Lella Loves... Vintage Footstool

Making sure I did not misplace the wooden nut, I removed the old fabric from the seat. For ease and speed, I reused the layer of filling.

Lella Loves... Vintage Footstool

I used a fabric with a pattern to centre the fabric and I did this by looking for one line to create my equator. I have placed the scissors to draw your eye to that line.

Lella Loves... Vintage Footstool

Using a heavy-duty staple gun, I fixed at the four cardinal points and then infilled. Every second staple, I checked to make sure the fabric was not being skewed out of shape.

The piece of upholstery fabric I chose was a designer sample which I picked up on my travels to a scrapstore. 

For more information on scrapstores, click on:


Lella Loves... Vintage Footstool

I married the two pieces back together and fixed with the original wooden nut.

Lella Loves... Vintage Footstool

My lovely finished stool which soon found a friend :)

Lella Loves... Vintage Footstool

If you quite fancy a little footstool like this for your special ted, keep an eye on eBay. A stool like this is easy to wrap and post.

A fun day out can be had if you go to a large collectables fair but pop in to antique centres when you see them. I rarely shop with an item in mind but I do have a wanted list and it helps me to focus as well enjoying the search.

Have a lovely day.

Lella  xx

http://lellalovescreativity.blogspot.com

Saturday, 13 August 2011

Hand-tied Ribbons and Bows

Hello there and welcome to my 'How to make a beautiful bow' tutorial.

If you love ribbons and you have always wanted to be able to give beautifully wrapped gift boxes or give a bear a bow, today's creative challenge is just for you.

Tying the perfect bow is a bit like juggling: once you 'get it', you will never forget how to do it.

Here are two examples: a gift box (single ribbon) and a teddy (three layers of satin and silk sheers), both showing bows hand-tied by me.

Lella Loves... Ribbons and Bows

Lella Loves... Hand-tied Gift Bows

To create a single bow, you will need:

A piece of ribbon about 1inch wide and approx 2 - 3 metres in length.
Gift box
Nimble fingers
Patience!

The tails need to lay left over right. This is the collar and their placement is crucial.

Lella Loves... Bows (1)

Start by wrapping the ribbon around the box so it ends. See photo 1.

Lella Loves... Bows (2)

Take the tail which is on the right hand side and fold it up and under the collar on the right hand side. See photo 2.

Lella Loves... Bows (3)

Bring the two tails down and, using both hands, make a loop in each of the tails. See photo 3.

Lella Loves... Bows (4)


Now fold the loops back on themselves. Fold them right over left. See photo 4.


The next move sounds complicated but what you are doing is the reverse of the original granny knot in the collar.

Lella Loves... Bows (5)

Look at the photo to see, at this stage you should have a loop peeking out the top on the left hand side.

Now take the tail which is sitting on the right hand side and pull it down, over the right hand loop. To be clear, this is the tail which has the pink underside showing - it is this tail which needs to come down to face up on the right bottom. See Photo 5.

Lella Loves... Bows (6)

This is how your bow should be shaping up. The bow will be coming to life at this stage. (Exciting, isn't it!)

However, keep calm and gently tighten the bow whilst retaining the shape. The temptation to tug and pull too tightly must be restrained. After all, this is a Lella Bow  (^_^)

Lella Loves... Bows (7)


Remember, you are not tying shoelaces! 
Make it the best it can be. Check your progress using photo 7.


*Tip: When tightening the bow, slip your first two fingers from your left hand inside the loops and pull gently on the tails with your right hand. The loops will keep their shape if you master this thumb-holding  technique. 

Lella Loves... Bows (8)


The aim is to manipulate the ribbon into a beautiful bow. Simply adjust and tighten according to the ribbon you have used and the size of the loops you want.

Ta...dah!  Your bow should now look like this. See photo 8 below.

Do note that the centre ribbon should sit perfectly and facing downwards as a strip.


Lella Loves... Bows (9)

Your first few attempts might well result in a bowtastic mess but don't worry; follow the instructions at the pace Mr Snail would!

Don't be afraid to undo and start again if it looks shoddy. Be patient with it to achieve the best results especially if you are using a ribbon with a definite face side such as velvet or a printed sheer. It might only be ribbon but it can look super when tied correctly.


Lella Loves... Bows (10)


This is a common error - the ribbon gets twisted at the 'up and under' fold. The loops have twisted as you have fed through at the second grannie knot stage. See photo 10 or start again and refer back to photo 1.

If you would like to buy some ribbon, please use the Buy Now button and do fill in the text box to let me know which colour(s) you would like.


Ribbon Types
State your colour choice(s):


Here is another example of a bow made using two pieces of silk organza ribbon.

Lella Loves... Ribbon and Bows

Remember, if you are not happy with how your finished bow looks, pull on the tails to take you right back to the first granny knot on the collar.

Be patient and start again by forming the two loops on each side. Practice over and over because once you learn this skill, it will be with you for always.

You are welcome to leave me a comment and if you enjoyed this.

Many thanks.

Lella  xx

http://lellalovescreativity.blogspot.com

Tuesday, 2 August 2011

Teddy Bear Necklaces

Do you have an old teddy?  Are you a fan of Charlie Bears?  

Today's project is to make your favourite bear a necklace using wooden beads, buttons, a brass bell or an old key. You could try using charms off a broken necklace or any mis-matched buttons you have in the sewing box. 


Keep any pieces of lovely ribbon and you could make something like this for your bear.

Lella Loves... Teddy Necklaces

This bear (see below) I bought at an afternoon car boot and he was stuffed in a box with toy cars, doll's clothes and a wooden boat.

Lella Loves... Being Creative
I made his necklace from a piece of waxed cord and a handful of old buttons. 

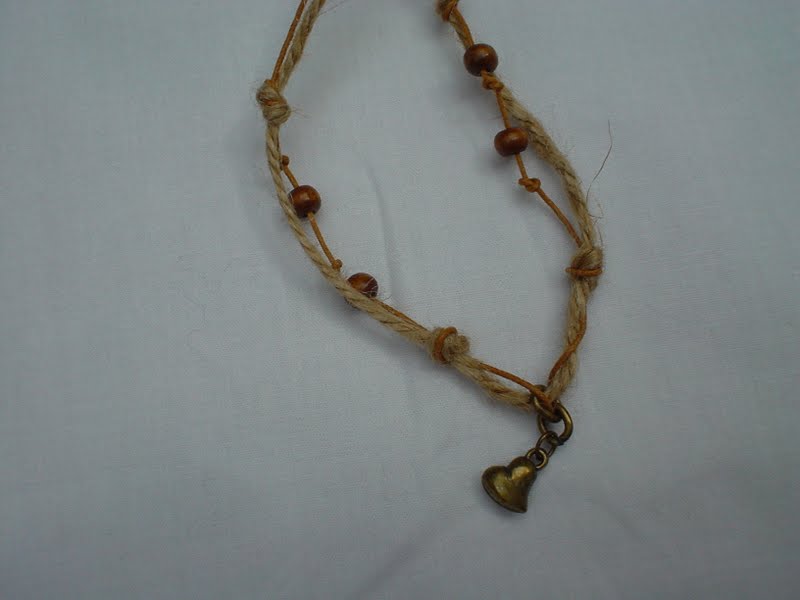
Here is another necklace (see below) which I made from wooden beads, cord and jute. The little heart pendant came off a broken charm necklace.


Lella Loves... Being Creative

Lella Loves... Teddy Necklaces


Once you have your beads and buttons ready, all you need is something to thread them with. Many craft shops sell waxed cord - £15 a reel - or leather thonging for £60 a reel. 

*Tip: I used garden twine, a brass bell and wooden beads in this project as I wanted that prim, rustic look.

If you wanted to make a necklace, I am happy to provide you with all the items you require. 


The kits can be ordered in any colour you want.  

Choose from the drop-down menu to make sure you receive a kit with colours you love. 


Colour Options


Here are some examples of how to thread. Be creative, ladies and let me know what you think of the projects by leaving a comment.
Many thanks for reading.
Lella  xx


Lella Loves... Being Creative


Lella Loves... Being Creative


Lella Loves... Being Creative


Lella Loves... Being Creative


Lella Loves... Being Creative

http://lellalovescreativity.blogspot.com

Lella Loves... Books

All books are free postage and are shipped from Amazon UK.

Click on any book to see price and availability.

Usually delivered within 48 hours.

More books to browse