Showing posts with label paper craft. Show all posts

Monday, 10 October 2011

Confetti Cones (from Paul McCartney's Wedding)

It is the start of a new week and the start of a happy union for Sir Paul McCartney and the lovely Nancy Shevell.

Today's post shows you how to make confetti cones just like these cones which were used by Barbara Walters and the McCartney family at Sir Paul and Nancy's wedding yesterday.

Lella Loves... Confetti Cones

The confetti cone and rose petals were gathered from the steps of the registry office of the Old Marylebone town hall in central London yesterday (Sunday, October 9th 2011).

Lella Loves... Confetti Cones

Here is a link to see the cones at the wedding:


Lella Loves... Confetti Cones

The confetti are real rose petals which I have photographed for you. Many fans will be pleased to see the pretty lemon yellow and pink blush petals but please know that they are now 24 hours old and are showing signs of their age.

http://www.heraldsun.com.au/entertainment/confidential/third-time-plucky-for-paul-mccartney/story-e6frf96o-1226163377452

The cones from Paul and Nancy's wedding are simple in design. They have that homely chic and are very easy to make.

To make similar cones, you will need:

White paper (20cm x 31cm)
Brown Paper (18cm x 34cm)
Doilies (18cm dia)
Scissors
Sellotape
Confetti (rose petals, rice paper or silk petals)

Lella Loves... Confetti Cones

Cut your chosen paper into these sizes:

Inner cone (brown paper in this blog-make) should be: 20cm x 31cm

Outer cone (white paper in this blog-make) should be: 18cm x 34cm

You could use beautiful wrapping paper, several layers of tissue or even handmade paper. The choice of paper is the bride's prerogative. The paper doily adds a homespun touch which is so simple yet effective.

If you were organising the bridal shower, why not make it a lovely night in with a combined bridal shower and craft evening. That would be something to remember!

Let's begin. Start by making the inner cone first.

Lella Loves... Confetti Cones

Take the bottom left corner and begin to roll it.

Lella Loves... Confetti Cones

Pinch the bottom while you are forming the cone.

Lella Loves... Confetti Cones

Roll the paper to the right and you will see your cone start to form.

Lella Loves... Confetti Cones

Two and a half turns and you have done it.

Lella Loves... Confetti Cones

Take a piece of tape to secure.

Lella Loves... Confetti Cones

Well Done! You have just made your inner cone.

Now let me show you how to wrap the outer cone.

Lella Loves... Confetti Cones

Lay the outer paper down flat.

Lella Loves... Confetti Cones

Place the inner cone and wrap the sheet around it.

Lella Loves... Confetti Cones

This might take you two or three attempts but have fun and play with your design until the two corners fold as opposites.

Lella Loves... Confetti Cones

Once you have found the look you prefer, tape it to secure. This is the cone shape you will want to achieve as it symbolises a heart.

Lella Loves... Confetti Cones

Now all you have to do is to take the pretty doily, cut it in half, wrap around the cone and tape to secure.

Ta Dah! You have created a truly delightful confetti cone and it now just needs filling.

Lella Loves... Confetti Cones

I have photographed mine with silk roses just to give you an idea. They were bought from a fabulous homestyle boutique in North Herts:

http://www.homestansted.co.uk/artificial-silk-flowers-92/shades-of-pink-95/victorian-pink-rose-bouquet-7078.html

Please join me in wishing Sir Paul and his new bride good health and happiness. I do hope you enjoyed seeing these cones as it was their wedding which gave me the blog-make idea.

Bright Blessings,

Lella Loves, Loves Me Do.  xx

Here is another link to Hello Magazine and their picture of the happy couple.

http://www.hellomagazine.com/celebrities/gallery/201110096283/paul-mccartney-wedding-nancy-shevell/13/


For those of you who are wondering how or why I have a confetti cone and rose petals from Paul McCartney's wedding, it is because my husband was standing on the steps as a spectator.

There were several newspaper reporters who didn't know some of the guests' names and it so happens that my husband is an old hand-clapper of rock and roll so he was answering questions from the photographers and advising a few journalists on the who's who. If they asked, he was happy to oblige.

I said on a previous post: knowledge is nothing unless it is shared.

Lella xx

http://lellalovescreativity.blogspot.com

Saturday, 8 October 2011

Old Children's Books

I love old children's books. This delightful book is an early Rupert The Bear annual and I bought it with the intention of cutting it up!  (I think I just heard a few gasps!)

Lella Loves... Old Children's Books

The Rupert annual is from just after the second world war c1946 and was at a table-top book sale for £10. The colours are so bright and I adore all the little images. They would look lovely framed up as individual pages.

Lella Loves... Old Children's Books

However, all that changed whilst watching Wednesday's 'The Antiques Road Trip' on BBC1. I nearly fell off my chair when I saw Charlie Ross haggling over a similar Rupert The Bear annual from the same time - c1946/1947.

The dealer said that the retail price on his Rupert annual was £105.

Lella Loves... Old Children's Books

I am now rethinking about cutting it up for decoupage. I can't bring myself to do it as this annual might be a collector's dream find.

Lella Loves... Old Children's Books

The inside front cover has a lovely piece of text, reminding us that after the war the book was produced in line with the economy standards in force at the time.

*******

Another book I picked up last month is the Noddy book.

Lella Loves... Old Children's Books

This is a much later publication and is most probably c1977.

Lella Loves... Old Children's Books

On further inspection, this book is also just too lovely to cut up.

Lella Loves... Old Children's Books

The colours are incredible and would make very pretty toy box liners. But, alas! I cannot bring myself to take scissors to either book.

Lella Loves... Old Children's Books

Have a lovely weekend and don't worry, I promise not to cut them up.

If you have any interesting information on Rupert annuals, please do leave me a comment as knowledge is no use unless it is shared. I would really appreciate it.

Many thanks,

Lella xx

http://lellalovescreativity.blogspot.com

Thursday, 6 October 2011

Handmade Paper

I love handmade paper and although I recovered this lampshade a few years ago, I still wanted to show you just how easy it is to do.

If you have a boring card lampshade which you really detest but it is on a lamp that you really love, simply recover it.

Lella Loves... Handmade Paper

This lovely lampshade was previously a plain white card shade which I covered with handmade paper. I chose the most beautiful paper which has flower petals and bits of stem and leaf in the paper. 

Similar papers are detailed below such as paper made from old bank notes, grass cuttings or even elephant poo!

Lella Loves... Handmade Paper

TK Maxx is my favourite shop for bargains. Their reducements section is always a mess and I turn that into an opportunity: where people stay away, I dive in! Rummaging the red tickets can unearth a few gems.

Lella Loves... Handmade Paper

This variety pack of beautiful handmade papers was only £3 which is an amazing bargain. I hope to use the orange paper to recover a book but that is a blog-make for another day.

Lella Loves... Handmade Paper

All I did was take the lampshade off and draw around the bottom section to create a small template. I then cut out three sections, all the same size and I simply glued them onto the original card shade.

Voila! An old lamp with a new look.

If this inspired to to jazz up an old lampshade, look for beautiful handmade paper. One of the best internet shopping sites for really unusual paper is the Exotic Paper Company on 01823 421805

They make highly individual, bespoke papers and many have visible inclusions.

Contact them for samples if you fancy using paper containing:

Sterling (paper including shredded bank notes)

Glitter (paper including holographic slivers)

Grass (paper including grass cuttings)

Wildflower (paper including wildflower seeds)

Lavender (paper including lavender flowers)

Cress Seed (paper including cress seeds)

Straw (paper with a straw fibre content)

Banana (paper with banana skin fibre content)

Moorland (paper containing natural compost)

or try their

Ellie Poo (paper with an elephant dung fibre content)

Rhino Poo (paper with a rhino dung fibre content)

http://www.elliepoopaper.co.uk/

Have fun and do leave me a message if you update a lampshade, cover an old book or simply frame a sheet of rhino poo paper!

Lella  xx

http://lellalovescreativity.blogspot.com

Thursday, 8 September 2011

Framing Up (Cards)

Today's little project is short and sweet. Very sweet! 

If you like to have pretty pictures in frames instead of your great aunt and her cats, why not try framing up a greeting card or a cut-out from a box.

I chose to frame up a lovely card - pink iced biscuits - from a pack of 12 which are only £1.99 in a clearance book store.

Lella Loves... Picture Frames

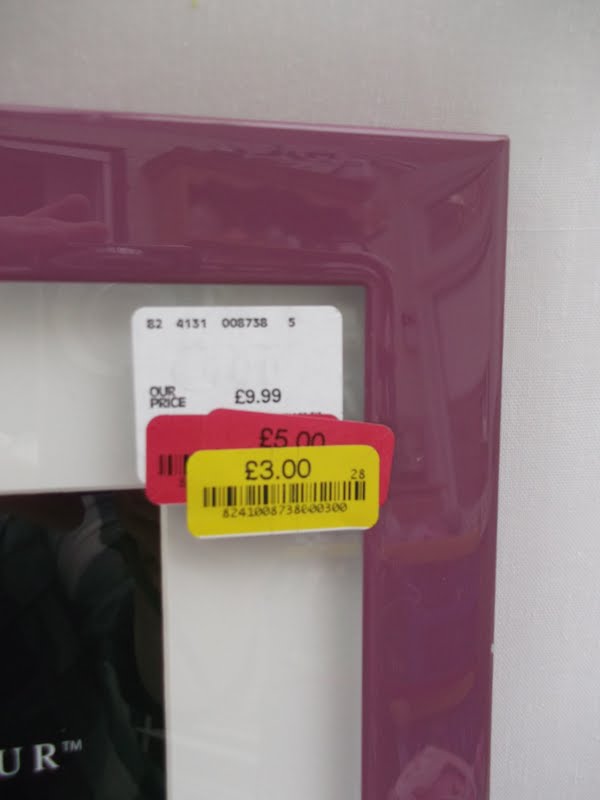
I encourage you to rummage in the reducement section in TK Maxx. Here is a glossy frame I found for £3 last week. The frame's lacquered colour is similar to thick and fruity black cherry yoghurt.

Lella Loves... Picture Frames

Don't be afraid of coloured frames as they can look fabulous when matched up with the right image.

If you liked the look of this project, you will need:

Frame
Favourite Greeting Card
Sellotape

To get started, remove the label and slide the back off.

Lella Loves... Picture Frames

Do not throw away the inner piece of cardboard as it is a support for the mount.

Select you chosen card.

Lella Loves... Picture Frames

You can just see in the photo, at this stage you need to add two pieces of sellotape to the top and bottom of the card. 

*Tip: Stick the sellotape to your clothes first as the layer of clothing fluff will dull the tape's adhesive. If you make a mistake with the mounting, this tip will allow you to reposition without tearing either the mount or the image.

Lella Loves... Picture Frames

Now take your mount and, with the card facing up, place the mount over the image and gently press on the sellotape.

Lella Loves... Picture Frames

Slide the mount and the cardboard backing into the frame and secure with the backboard.

Lella Loves... Picture Frames

This is how your finished card should look. Choose an image you love looking at. It is fun to frame up your favourite birthday card. I chose biscuits as I want to use this framed image as a book-end for the cookery book shelf.

Keep an eye open for bargain frames and don't worry if the glass is damaged. I have an idea for a frame like that next week.

See you soon

Lella  xx

Wednesday, 31 August 2011

Framing Up (Posters and Prints)

Hello there and welcome to Wednesday's post.

Yesterday I spoke about scrapstores and local recycling projects/art clubs. Today I want to show you a very large, 16'' x 24'' poster which I picked up on my last visit to my 'scrappy-do'.

It is a lovely print, but with a huge crease along the bottom, and would have been damaged or maybe even torn sooner or later.

Lella Loves... Prints

Having brought the kettle and pumpkin print home a few weeks ago, I was wondering where to site it and I was even considering trimming it completely and putting it on my cork boards as a main backing print.

However, that was not meant to be. Last Thursday, I wandered into a charity shop whilst waiting for my husband. To my surprise, the charity shop had loads of photo frames and larger framed prints under the table.

I bought this very large framed print for the bargain price of...

Lella Loves... Framing Up

...three English pounds. Yes, £3 for a solid wood, glazed 16'' x 16'' frame. What a bargain  :)

Lella Loves... Framing Up

I took it home and whipped off the back. After taking out the print and the mount, I used the glass as a template over my kettle and pumpkin poster. (Remember, the print was free from the scrapstore.)

Lella Loves... Framing Up

And this is what the print looks like now. All framed and glazed and sitting happily in my kitchen. 

Lella Loves... Framing Up

This whole project came about because of the joy of scrapstores and the thrill of a charity shop visit.

If you like having things on your walls, you cannot go wrong with a rummage in a charity shop. Be open to buying frames before you have anything to put in them. 

Have a lovely day and don't forget to have a look at yesterday's post if you are interested in the idea of joining a scrapstore.

Lella xx

Monday, 29 August 2011

Scrapstores and Recycling Arts Projects

Hello there and with the start of a new week, I want to tell you about a fabulous resource that is most probably within 10 or 12 miles of your house and you didn't even know it:  Scrapstores.

Yes, scrapstores are the future! They are recycling warehouses, often funded by your local council and they sometimes go under the name of a Recycling Arts Project/Club.

I have included photographs to show you some of the items I have discovered and brought home on my trips to my local arts project. They are an example of what can be found. All of this fabric came from my local scrapstore - for free!

Lella Loves... Scrap Fabric

I promise you that if you went to a scrapstore, you would be amazed at the range of products available to you for free (once you become a member, of course.)

Lella Loves... Buttons

How it works:

Business offer their local scrapstore non-toxic, clean waste and, as such, the scrapstore's 'stock' varies from week to week. The scrapstore staff/volunteers collect the useful 'scrap' from local companies and make it available to their members - for free! All you pay is a joining fee and you are then able to take whatever you need for craft projects, school plays, after-school art activities and so on.

The other good news, on becoming a member, is that you are doing something positive for the environment.  Reusing and upcycling clean, commercial waste is another way to bring different items into your craft room.

To give you an example of the items you might find, my local scrapstore collects cardboard tubes from a printing press, fabric sample books from high street stores and designer manufactures, greeting cards and over-runs from a local printer as well as foam, kapok, and wadding from an upholstery firm.

Last time I visited they had bolts of fabric, loads of zippers, promotional pin badges, old posters, ceramic tiles, bubble wrap, rub-off foils, plastic containers, tins, bottles, picture frames, ring binders and so on... 

Lella Loves... Picture Frames

A is for Aladdin's Cave:

Scrapstores are the Aladdin's Cave of creative crafting and 'Lella loves' creativity! :) 

You are only limited by your imagination. These hidden gems offer individuals as well as schools, clubs and play groups, a wide array of clean, reusable waste, and it is waste that you and I would otherwise never get the opportunity to salvage.

Lella Loves... Old Signage

I say to you today: look up your local scrapstore and pay them a visit. If it is not for you, no harm done!

However, if you are like me and you love fabric, buttons, old frames, paper, trimmings and so on, then do please join the hundreds of other members and benefit from being a member of a scrapstore and for a (usually) very low annual membership fee.


Here is the link to the list of scrapstores in the the UK.


Visit a scrapstore this week and remember, half the fun is that you never know what you might find there.


Please let me know if you went and joined and feel free to post a comment. 


Lella  xx

Thursday, 25 August 2011

Cork Boards (Memory Wall)

Today's blog post shows you that a few cork floor tiles and some seriously strong adhesive are all you need to create yourself a 'wall' for your own personal memories.

Facebook folk should love this project!  :)  Yes. It's a noticeboard with a twist.

Lella Loves... Cork Tiles

My cork tiles are behind the door in my craft room. It was an unused space where the car boot table and the coats used to hang.

To make your memory wall, here is what you need:

Pack of cork floor tiles
Epoxy adhesive (Buy the twin set for wood and cork)
Drawing pins or pretty pin studs.

Lella Loves... Cork Tiles

Start by fixing a pack of 6 cork floor tiles to the wall using an epoxy glue. (I used blue Araldite.)

Lella Loves... Cork Tiles

Take one large image - I used a print from an old frame -  and, once in place, start to pin up your treasured pieces such as photographs, letters and postcards from friends. Let them overlap slightly. Build your wall with the items you have and then let it grow naturally.

Lella Loves... Cork Tiles

Working in a methodical way, add more pictures and other items you have kept such as gig tickets, maps and business cards. Pin up items as the days pass.

This might well be a gradual layering over time so don't worry too much about their positioning. Right angles and straight lines is not the look you should be going for.

Lella Loves... Cork Tiles

I have kept some lovely things and some odd things over the years. The sleeve of a Madonna compilation VHS reminds me of a time working in that industry, a greeting card with a cow jumping over the moon and a 3D moon decoration remind me of holidays long past.

Lella Loves... Cork Tiles

Your memory wall will soon look like this and once you have started it, simply add as you find things. Look upon your wall as an open scrapbook and take time to enjoy the creative side of this on-going project.

Lella Loves... Cork Tiles

I like the shape of the jukebox cocktail menu from a birthday party outing. Memories are precious and to cherish them, photos of my cats who have gone to spirit are there as well as interesting bookmarks, magazine clippings and anything which I like to look at.

Lella Loves... Cork Tiles

Keep on adding. One cork wall is never enough and you might end up with two.

Am I too old to wear a button pin? Who knows? However, a humorous pin badge went straight on my wall!

Lella Loves... Cork Tiles

This little project will continue on if you want it to. I have had mine since February/March 2002 and I still add to it as well as removing things which no longer raise a smile. Editing is important as your wall will evolve with you: it reflects you and your life so enjoy it.

Have a lovely day and make space for a pack of cork tiles :)

Lella  xx

Lella Loves... Books

All books are free postage and are shipped from Amazon UK.

Click on any book to see price and availability.

Usually delivered within 48 hours.

More books to browse