Friday, 10 February 2012

Silk Flowers (Persimmon)

There are no actual flowers in today's post. Instead, I used these amazing persimmon fruits - on stems - from Sia. They are everlasting, not real, even though they look and feel like ripe fruits to touch.

I bought every single one the lady could find around the store!

Lella Loves... Everlasting Fruits

To recreate this display, you will need:

15 everlasting persimmon fruits on stems
Enamel jug
Marbles or glass nuggets

Lella Loves... Everlasting Fruits

Each stem has two fruits and the attention to detail is fabulous.

It might seem a large initial outlay for one display but, over time, it is pennies per week. These persimmons were £5.50 a stem and on that same day, a bunch of 6 Madonna lilies was £40: I opted for the fruity stems and, 7 years later they are still here.

Lella Loves... Everlasting Fruits

I used 15 stems in this display and to start, I filled the old enamel jug with glass nuggets.

Lella Loves... Everlasting Fruits

Taking one stem at a time, arrange in the spout first, then work your way around the jug.

Lella Loves... Everlasting Fruits

You should aim for that, 'Just picked' look to your display.

Lella Loves... Everlasting Fruits

This is the end result and I love it. It appears to be top-heavy but it's not.

Do leave me a comment if you too enjoy arranging everlasting fruits and twigs as well as silk flowers.

Have a great day.

Lella  xx

http://lellalovescreativity.blogspot.com

Thursday, 9 February 2012

Knitted Cushions

Cushions are fun and easy to make. A current trend in home furnishings are knitted cushions. To make a cushion cover from a jumper, all you need is a well-worn wooly and a cushion pad.

Lella Loves... Knitted Cushions

Lay your jumper out on a flat surface, place the cushion pad in the front centre and fold the bottom of the jumper underneath the front and then pin the four corners.

Remove the cushion pad, turn the jumper inside out and run a free-hand running stitch up three sides.

Starting at the bottom right, sew up, across the top and then back down to the bottom, sewing it as straight as you possible can. Use the pattern as a guide if it helps.

Once you have tacked the cushion by hand, cut out and leave an inch between the scissors and the free-hand stitched edge.

Your unsewn bottom section is your envelope fold.

Turn your jumper the right side out and insert your cushion pad.

Hey presto!  A cardy cushion handmade by you.

Lella Loves... Recycled Fabrics

These panels are samples from a knitwear supplier and I found them at my local recycling arts warehouse. Look out for knitted sweaters in your local charity shop. Chunky cable knitted jumpers can be found for a few pounds.

*Tip: Never worry about holes as they can be darned with wool taken from the off-cut.

Have fun and keep warm!

Lella xx

http://lellalovescreativity.blogspot.com

Wednesday, 8 February 2012

Handbag Charm (Hearts)

Handbag charms are one of my favourite things to make. I love beading and by using broken necklaces and old pendants, you too can create something similar for your handbag.

Lella Loves... Handbag Charms

This is my Valentine's inspired bag charm. If you enjoy beading, please follow this blog-make and you can see how I made it.

Lella Loves... Handbag Charms

This is a photo of my handbag with the fabulous black hearts charm pin which I made last year. The blog-make for this black pin charm can be found on this link:

http://lellalovescreativity.blogspot.com/2011/08/handbag-charm-pins.html

Lella Loves... Handbag Charms

I took this photo to show you the £28 designer charm on the left and my creation on the right. Don't be afraid to be inspired by boutique pieces, just don't pay boutique prices!

Lella Loves... Handbag Charms

To make each handbag charm, you will need:

1 kilt pin
Several charms which follow a theme, such as hearts
Broken necklaces from which you upcycle the findings and links
Ribbon
Pliers/Snips

To start, lay out all your chosen pendants and charms as above. Choose beads and matching chains if you want to add length.

Lella Loves... Handbag Charms

Thread them on to the open end of the kilt pin. Rearrange and alter the charms according to their weight as you will not want the pin being too heavy on one side.

Lella Loves... Handbag Charms

Ribbon is the secret ingredient to stop your findings rubbing together. By adding ribbon loops as spacers, the chains and links will dangle freely.

Finally, once you have the overall look, take sections of necklace which have large links, gently unfurl and use them as jump rings to secure your charm-work to the closed side of the kilt pin. Make sure you are happy with your design before you do this stage.

All you have to do now is attach to a handbag and say to anyone who asks, "Yes! I made it myself!"

Lella  xx

http://lellalovescreativity.blogspot.com

Tuesday, 7 February 2012

Pot Pourri (Valentine's Day)

If you like to change your pot pourri once a month, I do hope you will enjoy today's Valentine's inspired project: it centres around two lovely carved wooden hearts I found in a flea market about 10 years ago.

Lella Loves... Pot Pourri

If you wanted to recreate this scented display for your home, you will need to find a large wooden bowl or a ceramic dish to arrange it all in. 

Look out for the following items:

Lella Loves... Pot Pourri

A very large, huge if possible, hand-carved, ethnic, wooden bowl. Mine is approximately 25 inches across. You will only need to purchase a bowl like this once. It is large enough to hold anything you can think of.

*Tip: Buy unusual handmade items when you see them or else you will regret it! More often than not, when you return, the item has sold.

Lella Loves... Pot Pourri

Dorma offer a good basic pot pourri 'starter kit' and their fragrances are fabulous. Their orange and sandalwood offering is delicious and not overpowering.

Lella Loves... Pot Pourri

These are the large twiggy hearts which I used yesterday as spacers for the fabric hearts bunting. Look out for these in all sizes from 1 inch to 24 inches!

Lella Loves... Pot Pourri

The wooden hearts are hand-carved and were already painted dark blue. They have signs of wear from a decade of being enjoyed and used in my displays.

Lella Loves... Pot Pourri

To show you the scale of the wooden bowl, I have placed a small pine cone in the centre. However, try not to use pine cones in spring/summer pot pourri blends as there are so many alternatives.

Lella Loves... Pot Pourri

As a lifter, I have used large twiggy balls simply because the bowl is huge and they offer a good base.

Lella Loves... Pot Pourri

The next stage to building up your display is to add pairs of straw balls, large seed pods, twig spirals and dried flower heads.

Lella Loves... Pot Pourri

The only items used in abundance in this display are nuts and star anise which are used as fillers.

Lella Loves... Pot Pourri

Keeping with Valentine's theme, add pairs of small and large twiggy hearts.

Lella Loves... Pot Pourri

The good thing with quality pot pourri is that you can add fragrance and change the contents around without them breaking or falling apart.

Pop back tomorrow for another Valentine's inspired blog-make.

Lella  xx

http://lellalovescreativity.blogspot.com

Monday, 6 February 2012

Fabric Hearts Bunting

Hello there, on this Snowy Monday!

Today sees the start of my Valentine's week of easy blog-makes. This delightful little project shows you how to make a swag of bunting for your kitchen.

It is not complicated, I promise!! and you could make the padded hearts in an hour or so. For the whole project, all you need are three fabric hearts and four twiggy hearts.

Lella Loves... Valentine's Ideas

The padded hearts are made from an off-cut of fabric and are stuff with recycled polyester filling (washed and saved from old poly-fill pillows).

Lella Loves... Recycling

A good stash of fabric and off-cuts is always a sight to behold!

If you wanted to learn more about recycling centres and how to salvage upholstery samples, please search in my blog's archive for Recycling Arts Clubs or click this link:

http://lellalovescreativity.blogspot.com/2011/11/scrapstores-and-recycling-arts-projects.html

Lella Loves... Fabric Hearts

To make your hearts, simply draw a template and cut out two sides for each heart.

Sew them together with the fabric facing inside out.

Leave an inch gap and then turn the hearts right side out.

Stuff with the filling and then hand-sew the hole using tiny stitches.

Lella Loves... Twiggy Hearts

These are handmade twiggy hearts made from willow. You could make them yourself but to save time this week, they can be found online or in Hobby Craft stores nationwide - £5.99 for 8.

Lella Loves... Valentine's Ideas

To create your heart garland, lay out the three padded hearts and use the twiggy hearts as spacers in between. When you are happy with the look, sew each of the padded hearts and the twiggy hearts together using three or four loopy stitches to hold the two hearts in place. Use invisible thread or microfine fishing wire to hide the joins.

Lella Loves... Heart Bunting

*Tip: Don't make the joining stitches too tight as your garland will buckle. Leave them ever so slightly slack. This will give the garland its natural swag.

I hope you pop back tomorrow for another heart-themed craft project. Do let me know if you make any of this week's blog-makes as I would like to see photos.

Bye for now,

Lella  xx

http://lellalovescreativity.blogspot.com

Thursday, 2 February 2012

Fabric Hearts Door Hanger

Valentine's Day is two weeks today and if you enjoy having a wreath or garland on your front door, why not hang two padded hearts and a big ribbon bow instead.

Lella Loves... Fabric Hearts

Here is a padded heart which you could make in an hour. Once you have made two, simple tie them together using a matching ribbon and hang on the door.

Lella Loves... Templates

All you need to do is to draw a heart-shaped template, use a pair of scissor to cut your fabric shapes and be able to sew two pieces of fabric together.

Lella Loves... Scrap Fabric

Gingham is always cheery, and it is a lovely fabric to use for homemade projects such as these padded hearts.

Lella Loves... Fabric Hearts

If you love fabrics, there is a great sense of satisfaction to be had once a project is completed. For a homespun look, use an old patchwork quilt. Old shirts are a good source of fabric for smaller craft projects.

If you wanted to make the hearts yourself, I have a tutorial post to help you.


Lella Loves... Ribbon

Two fabric padded hearts tied to your front door is a lovely decoration for February. Choose ginghams or ditzy florals to make your visitors smile. I chose this lovely wired red and cream checked ribbon for the bow.

*DOOR HEARTS PIC*
Lella Loves... Fabric Hearts


Have a lovely day.
Lella  xx

http://lellalovescreativity.blogspot.com

Sunday, 29 January 2012

Simple Pleasures (Gathering Leaves)

I have to say that I really enjoyed the hour spent gathering leaves. Mother Nature had blown them into huge banks against the fence, and the rain had made them a bit slippery, so I thought it was time to do something about it.

Lella Loves... Sundays

Mr Lella is not really the gardening sort so I don't worry if he doesn't offer to do it. If he did, I think I might pull up a deck chair and watch :)

Lella Loves... Sundays

My task was made easier with these fabulous leaf grabbers; huge yellow plastic mittens which pick up a bucketful of leaves which each scoop. Costing £7.99, they saved me a lot of time.

Lella Loves... Sundays

It is very satisfying to see my recycling bin filled to the brim.

Lella Loves... Sundays

If you love your garden and you have the space, place all your wet leaves into black bin liners and pile them up, out of sight until next summertime. What you will have, instead of soggy leaves, is the most amazing composted leaf mould - also called soil!  It is super-rich in nutrients and organic matter and it will go far if you add potting compost and some sand to create your own planting mixture.

In my photo, that pile of leaves has already started to decompose. The black stuff you can see is homemade compost, made in-situ as I had not gathered leaves from this section of path for 6 months.

Oooh... and whilst I was out in the garden, I noticed all the daffodils are pushing up. Their stem growth is looking good and I hope yours are too.

Lella  xx

http://lellalovescreativity.blogspot.com

Friday, 27 January 2012

Silk Flowers (Red Tulips)

Hello there and welcome to another floral Friday. Today's display is one of my favourites but I might have said that about another display as I am obsessed with arranging silk flowers.

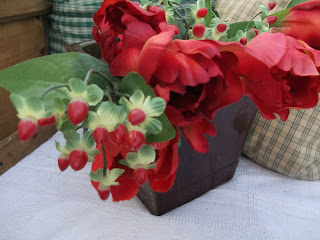
The arrangement below has 40 silk red tulips and 24 hypericum stems with bright red berries to match the frilly tulips.

Lella Loves... Silk Flowers

I have arranged my tulips and hypericum in a heavy glazed planter simply because I like the drippy, two-tone glazes used on Japanese garden pots.

Red tulips are fabulous and if you are not a silk flower fan, you can buy fresh in most supermarkets. I saw a bunch of 7 red tulips last week for £4. Change the water and trim the stems by half an inch every day and your fresh flowers will last a week.

However, if you wanted to create a similar display to mine, using all everlasting plants, you will need:

Lella Loves... Silk Flowers

40 silk Parrot tulips

Lella Loves... Silk Flowers

24 Hypericum stems

Lella Loves... Silk Flowers

A frost-proof garden pot is a good investment as they won't topple and you can always use them in the garden if you get bored with your display.

Lella Loves... Silk Flowers

Choose a garden planter, one which is an inch thick and glazed, if you like a heavy pot.

Lella Loves... Silk Flowers

Place all your stems together and trim the stems if needed. Some fake flowers come with a 30 inch stem so cut them back so they are one and a half times the height of your chosen planter.

*Tip: If your pot is 12 inches tall, trim your 30 inch stems to 18-24 inches. It is good to leave a few tall ones.

Lella Loves... Silk Flowers

Start your arrangement by adding one berry stem and then two tulips.

Lella Loves... Silk Flowers

Keep on building your display and just remember the one for you, two for me saying. Add one hypericum stem per two tulips and keep on layering.

Lella Loves... Silk Flowers

I have used hypericum berries to add dimension and they give the display a depth of texture. By adding a few very tall stems in between the nearly-finished display, you are able to add height but not heaviness.

Lella Loves... Silk Flowers

One of my finishing hints is to look down right above your display. The arrangement should look like a bouquet and have that 'just picked' feeling to it.

Lella Loves... Silk Flowers

Your finished planter should look something like this. I have left 7 of the hypericum stems a few inches longer than the rest as I like to add height using the chosen greenery. It reminds me of flag-planting in deep garden borders. Having taller plants in front of smaller shrubs draws the eye back and I love implementing that into my silk flower arrangements.

Have a lovely weekend and do please leave a comment if you love silk flowers. I am available for indoor commissions and I am happy to travel.

Lella  xx

http://lellalovescreativity.blogspot.com

Lella Loves... Books

All books are free postage and are shipped from Amazon UK.

Click on any book to see price and availability.

Usually delivered within 48 hours.

More books to browse